WARNING!!! THIS COULD PERMENANTLY BRICK YOUR PHONE!!! Please fully understand that this may cause some unwanted problem. Make sure you can take the risk. YOU’VE BEEN WARNED.
(This method may only works on Kernel Version: 2.6.32.21-gd2764ed. This information can be found in Settings->About phone->Software information)
First of all, let’s prepare the tools:
1. Terminal Emulator
2. VISIONary +_r14 (or Download it Here)
3. gfree(under GPL v3)
Install 1 and 2, then copy the gfree file to your tf card root.
Step 1:
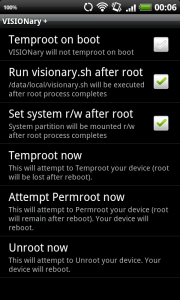
Open VISIONary, set the checkbox like this:

and then click ‘Temproot now’, and wait.
Step 2:
When it’s done, open the Terminal, input ‘su‘ and enter and click ‘allow‘ in the pop-up window, which is come form the ‘superuser’ app:
![]()
you will notice that the ‘$’ has changed to ‘#’. This means you have gain the root promission.
then input:
[code=’cpp’]
mount -o rw,remount -t yaffs2 /dev/block/mtdblock3 /system
[/code]
which makes the /system folder write-able.
then copy the gfree file to the /system/bin folder by inputing:
[code=’cpp’]
cp /sdcard/gfree /system/bin
[/code]
then run the gfree:
[code=’cpp’]
/system/bin/gfree -f
[/code]
after a lot of lines, you’ll see ‘Done‘ at the bottom.
Step 3:
go back to VISIONary, now click the ‘Attempt Permroot now‘, after confirmation, your phone will reboot.
And if everything works fine, your Desire Z/G2 should be rooted. Go to terminal and input su for a test!