DIY shutter release

This is a idea/plan that I want to do.

Lately I brought a Canon 60D, and it’s cable shutter release is using 2.5mm audio jack which is a quite common and cheap so I decide to make one or more cable shutter release/s.

From the tip to the cable, there’s three contact point. Normally there are Left | Right | GND, as using on the 60D, they defined as Shutter | Focus | GND.

Things to do:

1. Build a manual shutter release;

2. Using Arduino as a controller so time-lapse photography will be much easier.Done

So far for now, I’ll update when I make something new.

Update: After installed the MagicLantern firmware to my 60D, it got the intervalmeter function, so it no longer need a outer controller to do the clicking.
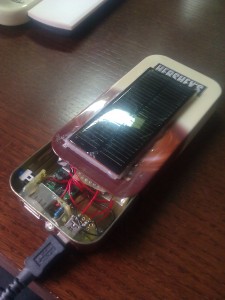
DIY External Power Pack

That’s the thing I made. I’ll edit this post with more detailed information later.

MeterialCountin CNYin USD(6.4:1)Comment
Box100from a box of Hershey’s
Wire100.150.02
Glue stick30.90.14
Battery1203.133.7v/3700mhA
protective circuit for battery13.80.59
Solar pannel16.81.064.5v/78mA
Schottky diode10.50.08ID 5819
booster circuit181.25pre-made, output 5V/500mA
LED10.10.02
Resister10.0202.2k
USB mini port10.280.04
self-lock button10.330.057*7mm
capaciter30.060.011μf
Battery Charger IC191.41MAX1555
bread board140.63
Total price53.948.43
DIY External Power Pack_cost accounting

Tiny USB input device

This is a idea/plan that I want to do.

Idea comes from the computer I’m using. My old computer (HP TX1106au) has a physical mute button and you just push it and it worked. But my new computer (ASUS U36sd), will, if I want mute, I need to put Fn key and F9 which means mute, but it only works when all the system is boot up because it depends on the software to function which I don’t like.

As I know, as a HID input device, mute has a designated key value Dec 127/Hex 7F (you can find it at: http://www.usb.org/developers/devclass_docs/Hut1_11.pdf on page 56). And this blog (http://hunt.net.nz/users/darran/) give me the idea to build a usb input device though I may not use arduino in the final model. What I may use is V-USB (http://www.obdev.at/products/vusb/index.html), and the chip maybe ATMEL attiny85, the ideal size is about a Logitech Unifying Receiver.

Modification of my laptop’s cooling system

After more than 3 years hard-working, my laptop’s CPU and GPU temperature became higher and higher. So I finally make up my mind to tear it down to pieces to do a tougher cleaning. And more, I find that there’s a little gap between the GPU and the thermal-pipe, stuffed with very unpleasant silica gel, which is the reason why my GPU’s temperature never been lower than 80℃, which is unsafe and harmful to the GPU and other hardware close-by. To replace that, I brought a little piece of copper which thickness is 1.2mm to fit into that gap. And it turns out that the copper is a little too thick for the gap, but after the test I think it still do the work so maybe some time later I’ll buy a thinner one to replace it. Here’s the photo I took.

Continue reading Modification of my laptop’s cooling system